

A follow-up to the first article, where I set up MiniMax H3 locally and wired it into Claude through MCP. Since then I have replaced the stock workflow with the Advanced Filmmaking workflow by Fox Fur Essence Films, run the same job across three platforms, and put together the full install guide for the workflow and its custom models. The Claude skill that automates the pipeline, updated for the new workflow, remains free here: minimax-h3-comfyui-desktop-fox15-mcp
The new workflow
The stock ComfyUI workflow for H3 works, but it leaves performance on the table. The Fox Fur Essence Films workflow layers several speedups on top of the same model: Sol-Attn sparse attention, Spectrum transformer-step forecasting, EasyCache step caching, INT8 quantised models and a LoRA-based acceleration, with optional RIFE frame interpolation to take the 24fps output to 60. In my tests with image references at 1MP, the same job dropped from 1,250 seconds on the stock workflow to 680 seconds on this one, a reduction of roughly 45% on the same machine and settings.
With a video reference the gains are even larger than I first measured. My initial run of the basketball test clocked 2,619 seconds, and I have not been able to reproduce anything like that number since; rerunning the same job on the updated workflow came down to 573 seconds, and I would rather report both honestly than quietly keep the better one. First runs compile kernels, caches warm up, and a single measurement of anything is not a benchmark.
The most useful tweak I found is hiding in the video loader. When you load a reference video there is an option to select every Nth frame, which controls how densely the model reads the motion source. Reading every frame put the 6 second, 1MP job at 865 seconds; reading every third frame brought it to 455 seconds, nearly halving the time again. The trade shows up where you would expect, in some lost detail on fast movement, but the overall motion and the adherence to the reference stay very good, and for most shots every third frame is plenty.
The workflow also adds quality-of-life control that matters more than the speed: a reference control panel with toggles for up to 6 picture references, video references and audio references, so switching between a simple image-to-video job and a full multi-reference setup no longer means rewiring the graph.
It also adds quality-of-life control that matters more than the speed: a reference control panel with toggles for up to 6 picture references, video references and audio references, so switching between a simple image-to-video job and a full multi-reference setup no longer means rewiring the graph.
The test: building a scene from parts
The brief I set myself was a one-on-one basketball play, one continuous handheld shot, drive past the defender into a jump shot, camera whipping up as the ball drops through the net.
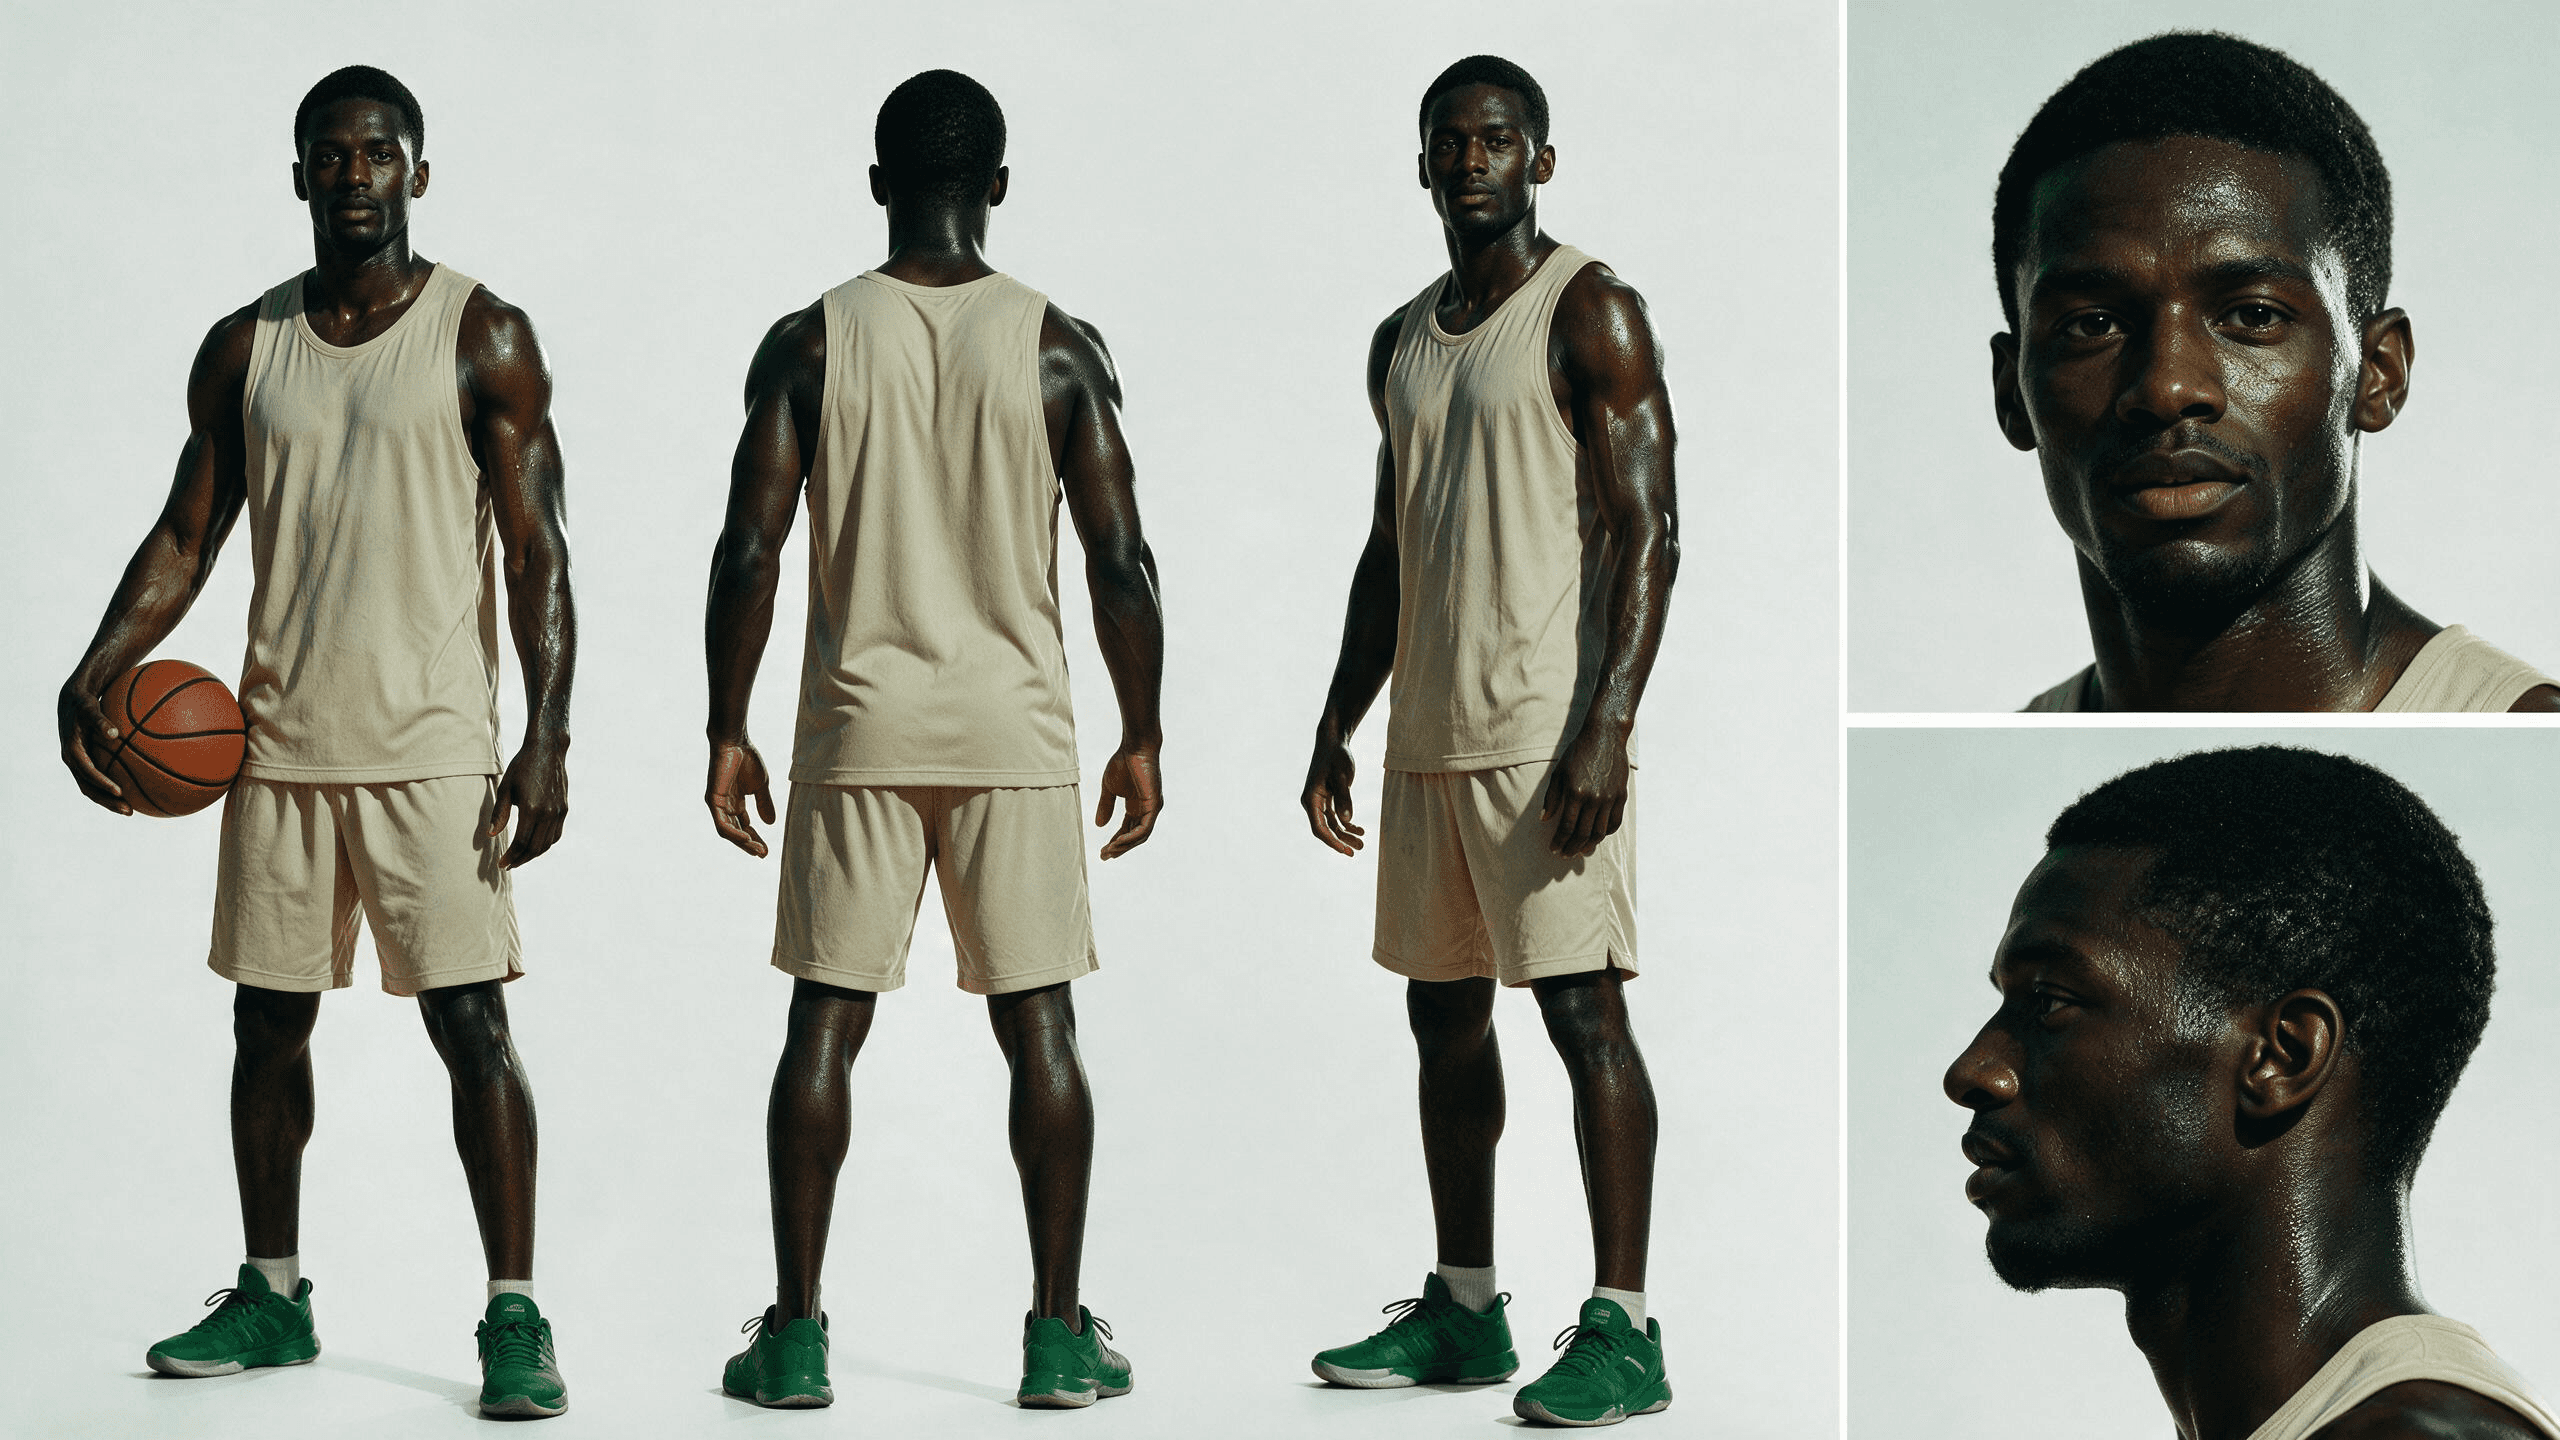
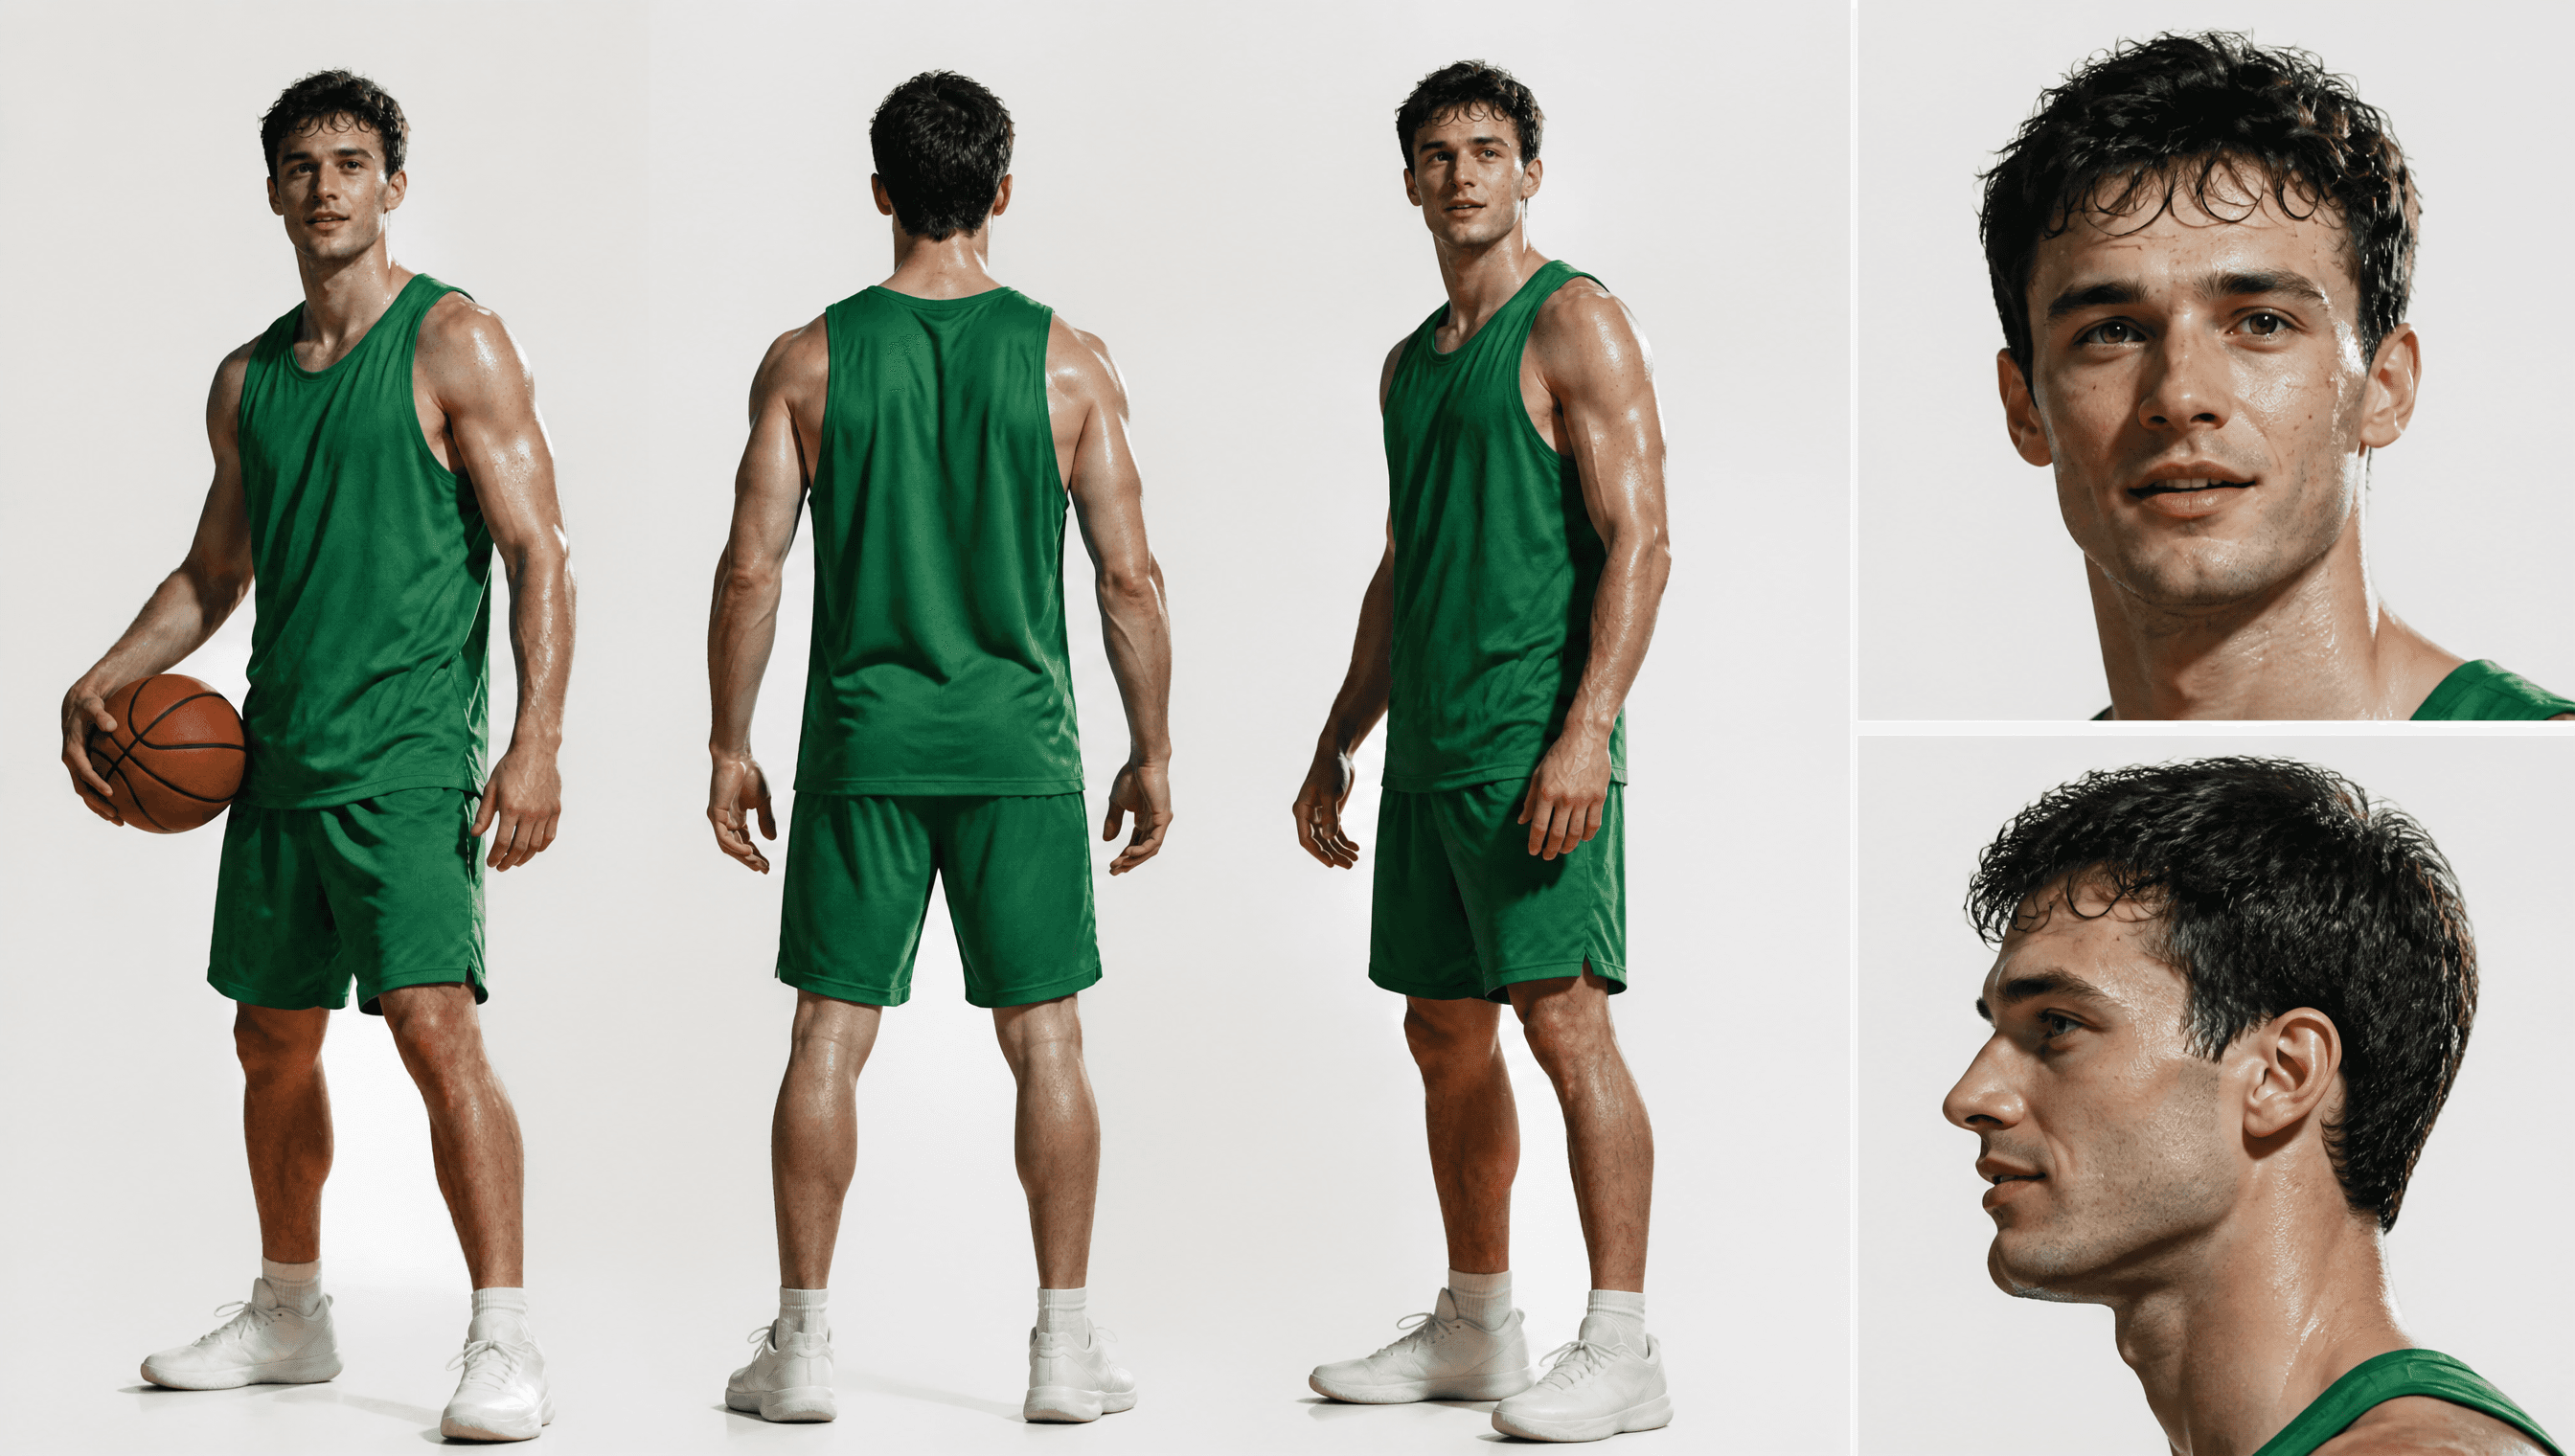
Everything was assembled from separate sources:
The characters. Both players were generated in Magnific, then converted into multi-angle character sheets, front, back, side and face close-ups, so the model has identity from every direction it might need.
The arena. Generated separately as an empty environment: polished hardwood, green neon tubing along the perimeter, dark empty bleachers, one warm pool of light at centre court.
The opening frame. A single still of the two players mid-contest on that court, giving the generation its starting state.
The motion. A stock clip of a real street basketball game, supplying only the play and the camera path.
This is the part that keeps me on this model. H3 reads all of these together as one context, holds the identities from the sheets, builds the scene from the arena frame, and takes only the movement and camera behaviour from the video. None of the source clip's people, clothing, daylight or portable hoop survive into the output. The prompt controls this explicitly through a retention analysis, declaring which references are fully preserved and which only transfer attributes; more on how that structure works, and its limits, further down.
The three-way comparison
Same brief, same references, run on three platforms:
Platform | Settings | Generation time | Notes |
|---|---|---|---|
ComfyUI Desktop (RTX 5090 laptop), new workflow | 6s, 1MP, 20 steps, video reference, every 3rd frame | 455s (~7.5 min) | 865s reading every frame; my first ever run clocked 2,619s and never repeated |
Comfy Cloud | 6s, 1MP, 20 steps | 931s (~15.5 min) | |
Comfy Cloud | 6s, 2MP, 30 steps | Failed | Hit the platform's job execution time limit |
Magnific | 6s, 768p, 16:9 | ~4 min | Cleanest output of the three; 1,560 credits for this job |
The Comfy Cloud failure is worth understanding rather than just noting. Cloud platforms cap how long a single job may run, and the 2MP, 30 step version exceeded that ceiling at around 36 minutes and was killed, with the compute time still spent. The lesson transfers to any hosted generation: know the execution limit before committing to a heavy configuration, and treat high-resolution, high-step runs as something you earn with a successful low-cost test first, exactly as on local hardware, where the constraint is VRAM and patience instead of a hard timeout.
All three successful generations came out very similar in motion quality, with Magnific producing the cleanest video. The desktop version then went through my Wan 2.2 T2V 14B upscale workflow to reach 1920 x 1080, which added another 752 seconds.
Where hosted platforms fit: the cost side
With local generation now under 8 minutes a clip, the question stops being local or hosted and becomes which jobs belong where. My working answer is that local carries the volume and hosted platforms carry the jobs that local cannot, whether that is hardware you do not have, a cleaner output for a hero shot, or the image models around the video work.
The numbers make the split concrete. The basketball job on Magnific, 6 seconds at 768p with one video reference and 4 image references, cost 1,560 credits. A year of Magnific Plus, priced at £24 a month on the annual plan at the time of writing, works out at £288 for 600,000 credits, which at this job's rate is roughly 385 videos of similar complexity, or about 75p per video. Video at pennies per directed take changes what you can promise a client, and the subscription earns its place well beyond video: it includes access to strong static image models such as Seedream 5 Pro, Nano Banana Pro and GPT Image 2, which is exactly where the character sheets and seed images in this test came from, plus a library of stock video usable as motion reference. Since a great seed image is most of what makes a great video, and video burns credits far faster than images, the economics favour a hybrid: build the image assets and occasional hero generations on the subscription, run the volume and the upscales locally, and you get MiniMax-level precision without needing premium per-generation platforms for every shot. For client work, that is a budget line you can actually predict.
Yes, even locally it takes minutes rather than seconds. But the fidelity to direction is the point: the play unfolds as written, the characters hold, the camera does what the prompt says. There are no wasted generations, and that changes the economics entirely, because one directed generation that lands beats an afternoon of fast rolls that do not.
Installing the workflow and models
What follows is the full setup for the Advanced Filmmaking workflow on a ComfyUI Desktop (standalone) install on Windows with an NVIDIA card. It is longer than the basic MCP setup from part 1, because this workflow leans on a compiled dependency stack that has to agree with itself. Everything is PowerShell, run in a normal window unless stated. Keep a Claude chat open while you work through it; every failure below was diagnosed by pasting the error in.
A note before you start. This guide is shared as is, for information only, and describes what worked on my own machine. Running the commands, scripts and prompts in this article is entirely at your own risk, and I accept no responsibility or liability for any loss, damage, data issues or system problems that may result from following it. Modifying system settings, execution policies and configuration files can affect how your machine behaves, so only proceed if you are comfortable working with tools like PowerShell, and back up anything you care about first. The third-party software mentioned here belongs to its respective owners, and their own licences and terms apply.
Step 0. Set your paths
Set these once per PowerShell session so the rest copy-pastes cleanly. Adjust to your install:
powershell
$Comfy  = 'C:\ComfyUI-Desktop'              # root of your ComfyUI install
$Models = 'C:\ComfyUI-Desktop\models'        # your shared models directory (Desktop Settings > Storage)
$Nodes  = Join-Path $Comfy 'ComfyUI\custom_nodes'
$Py     = Join-Path $Comfy 'ComfyUI\.venv\Scripts\python.exe'
$Comfy  = 'C:\ComfyUI-Desktop'              # root of your ComfyUI install
$Models = 'C:\ComfyUI-Desktop\models'        # your shared models directory (Desktop Settings > Storage)
$Nodes  = Join-Path $Comfy 'ComfyUI\custom_nodes'
$Py     = Join-Path $Comfy 'ComfyUI\.venv\Scripts\python.exe'
One warning that saves an hour: a standalone install has two Python executables, and only ComfyUI\.venv\Scripts\python.exe is the one that matters. Installing packages into standalone-env\python.exe succeeds, reports success, and changes nothing. Every pip command below uses $Py for that reason. Sanity check:
powershell
& $Py -c "import torch; print(torch.__version__)"
& $Py -c "import torch; print(torch.__version__)"
Step 1. The dependency stack
The workflow author is explicit about CUDA 13.0, since the INT8 convolution path runs roughly twice as slow on 12.6. Five layers have to agree: the NVIDIA driver (r580 branch or newer), optionally the CUDA Toolkit 13.0, PyTorch built for cu130, Triton for kernel compilation, and Sage Attention. Check everything at once:
powershell
nvidia-smi --query-gpu=driver_version,name,memory.total --format=csv,noheader
& $Py -m pip list | Select-String -Pattern '^(torch|triton|sage)'
& $Py -c "import torch, triton; print('torch', torch.__version__, '| cuda', torch.version.cuda, '| triton', triton.__version__)"
& $Py -c "import sageattention; print('sageattention OK')"
nvidia-smi --query-gpu=driver_version,name,memory.total --format=csv,noheader
& $Py -m pip list | Select-String -Pattern '^(torch|triton|sage)'
& $Py -c "import torch, triton; print('torch', torch.__version__, '| cuda', torch.version.cuda, '| triton', triton.__version__)"
& $Py -c "import sageattention; print('sageattention OK')"
If torch does not end in +cu130, upgrade the trio together, since mismatched torch, torchvision and torchaudio break silently:
powershell
& $Py -m pip install --upgrade --index-url https://download.pytorch.org/whl/cu130 torch torchvision torchaudio
& $Py -m pip install --upgrade --index-url https://download.pytorch.org/whl/cu130 torch torchvision torchaudio
Triton on Windows is the triton-windows package, not triton, and it needs the free Build Tools for Visual Studio 2022 with the Desktop development with C++ workload installed, because it shells out to the Microsoft compiler at runtime:
powershell
& $Py -m pip install -U triton-windows
& $Py -m pip install -U triton-windows
For Sage Attention, skip the 20 to 40 minute source build and use the prebuilt wheels from woct0rdho's releases, picking the one matching your CUDA, torch and Python versions:
powershell
& $Py -m pip install "https://github.com/woct0rdho/SageAttention/releases/download/v2.2.0-windows.post4/sageattention-2.2.0+cu130torch2.9.0andhigher.post4-cp39-abi3-win_amd64.whl"
& $Py -m pip install "https://github.com/woct0rdho/SageAttention/releases/download/v2.2.0-windows.post4/sageattention-2.2.0+cu130torch2.9.0andhigher.post4-cp39-abi3-win_amd64.whl"
If you upgrade torch later, Sage Attention must be reinstalled, since it links against the torch ABI.
Finally, update ComfyUI core through Settings, Updates. The Spectrum node targets a core from 3 August 2026 onwards, and EasyCache lives in core rather than as a custom node. Confirm with:
powershell
Get-ChildItem "$Comfy\ComfyUI\comfy_extras" -Filter '*easycache*'
Get-ChildItem "$Comfy\ComfyUI\comfy_extras" -Filter '*easycache*'
That must print nodes_easycache.py. Nothing printed means the core is too old.
Step 2. Install the custom nodes
Three packs, plus EasyCache which needs nothing:
powershell
Set-Location $Nodes
git clone https://github.com/kijai/ComfyUI-SolAttn_triton.git
git clone https://github.com/xmarre/ComfyUI-Spectrum-MiniMax-H3.git
git clone https://github.com/GACLove/ComfyUI-VFI.git
Set-Location $Nodes
git clone https://github.com/kijai/ComfyUI-SolAttn_triton.git
git clone https://github.com/xmarre/ComfyUI-Spectrum-MiniMax-H3.git
git clone https://github.com/GACLove/ComfyUI-VFI.git
The trap here: ComfyUI-VFI by GACLove is not the same pack as ComfyUI-Frame-Interpolation by Fannovel16, even though both do RIFE and look interchangeable in Manager. This workflow calls GACLove's node specifically, and already having the other one installed does not satisfy it.
Cloning does not install requirements, which is the step people skip and the source of most IMPORT FAILED errors. This handles any pack that ships one:
powershell
Get-ChildItem $Nodes -Directory |
  Where-Object { Test-Path (Join-Path $_.FullName 'requirements.txt') } |
  ForEach-Object { & $Py -m pip install -r (Join-Path $_.FullName 'requirements.txt') }
Get-ChildItem $Nodes -Directory |
  Where-Object { Test-Path (Join-Path $_.FullName 'requirements.txt') } |
  ForEach-Object { & $Py -m pip install -r (Join-Path $_.FullName 'requirements.txt') }
Step 3. Pre-download the RIFE weights
The VFI pack auto-downloads its weights on first use, but its downloader can die mid-render on standalone Python builds with an OpenSSL error, after you have already waited through the whole video pass. Fetch it up front instead:
powershell
$vfi = Join-Path $Nodes 'ComfyUI-VFI'
$tmp = Join-Path $vfi '_temp'
New-Item -ItemType Directory -Force -Path $tmp | Out-Null
$zip = Join-Path $tmp 'RIFEv4.26_0921.zip'
curl.exe -L --retry 5 -o $zip 'https://huggingface.co/hzwer/RIFE/resolve/main/RIFEv4.26_0921.zip'
Expand-Archive -LiteralPath $zip -DestinationPath $tmp -Force
$fl = Get-ChildItem $tmp -Recurse -File -Filter 'flownet.pkl' | Select-Object -First 1
Copy-Item $fl.FullName (Join-Path $vfi 'rife\train_log\flownet.pkl') -Force
Remove-Item $tmp -Recurse -Force
$vfi = Join-Path $Nodes 'ComfyUI-VFI'
$tmp = Join-Path $vfi '_temp'
New-Item -ItemType Directory -Force -Path $tmp | Out-Null
$zip = Join-Path $tmp 'RIFEv4.26_0921.zip'
curl.exe -L --retry 5 -o $zip 'https://huggingface.co/hzwer/RIFE/resolve/main/RIFEv4.26_0921.zip'
Expand-Archive -LiteralPath $zip -DestinationPath $tmp -Force
$fl = Get-ChildItem $tmp -Recurse -File -Filter 'flownet.pkl' | Select-Object -First 1
Copy-Item $fl.FullName (Join-Path $vfi 'rife\train_log\flownet.pkl') -Force
Remove-Item $tmp -Recurse -Force
Step 4. Download the models
All weights come from Comfy-Org/MiniMax-H3 on Hugging Face. The workflow uses two model families, one per branch: fl2va for text-to-video, image-to-video and first-and-last-frame work, and ref2va for reference-to-video, which is the branch everything in this article runs on. The recommended variants are the pruned_int8_convrot quantisations at about 19.5GB each, which are what the INT8 speedup targets. A full setup with both branches, VAEs and the text encoder is around 60GB, so check disk space first.
powershell
$hf  = 'https://huggingface.co/Comfy-Org/MiniMax-H3/resolve/main'
$dm  = Join-Path $Models 'diffusion_models'
$vae = Join-Path $Models 'vae'
$te  = Join-Path $Models 'text_encoders'

curl.exe -L -C - --retry 8 --retry-delay 5 --retry-all-errors `
  -o "$dm\minimax_h3_fl2va_pruned_int8_convrot.safetensors" `
  "$hf/diffusion_models/minimax_h3_fl2va_pruned_int8_convrot.safetensors"

curl.exe -L -C - --retry 8 --retry-delay 5 --retry-all-errors `
  -o "$dm\minimax_h3_ref2va_pruned_int8_convrot.safetensors" `
  "$hf/diffusion_models/minimax_h3_ref2va_pruned_int8_convrot.safetensors"

curl.exe -L -C - -o "$vae\minimax_h3_video_vae_fp16.safetensors" `
  "$hf/vae/minimax_h3_video_vae_fp16.safetensors"

curl.exe -L -C - -o "$vae\minimax_h3_audio_vae_fp32.safetensors" `
  "$hf/vae/minimax_h3_audio_vae_fp32.safetensors"

curl.exe -L -C - -o "$te\qwen3vl_32b_minimax_h3_nvfp4_awq.safetensors" `
  "$hf/text_encoders/qwen3vl_32b_minimax_h3_nvfp4_awq.safetensors"
$hf  = 'https://huggingface.co/Comfy-Org/MiniMax-H3/resolve/main'
$dm  = Join-Path $Models 'diffusion_models'
$vae = Join-Path $Models 'vae'
$te  = Join-Path $Models 'text_encoders'

curl.exe -L -C - --retry 8 --retry-delay 5 --retry-all-errors `
  -o "$dm\minimax_h3_fl2va_pruned_int8_convrot.safetensors" `
  "$hf/diffusion_models/minimax_h3_fl2va_pruned_int8_convrot.safetensors"

curl.exe -L -C - --retry 8 --retry-delay 5 --retry-all-errors `
  -o "$dm\minimax_h3_ref2va_pruned_int8_convrot.safetensors" `
  "$hf/diffusion_models/minimax_h3_ref2va_pruned_int8_convrot.safetensors"

curl.exe -L -C - -o "$vae\minimax_h3_video_vae_fp16.safetensors" `
  "$hf/vae/minimax_h3_video_vae_fp16.safetensors"

curl.exe -L -C - -o "$vae\minimax_h3_audio_vae_fp32.safetensors" `
  "$hf/vae/minimax_h3_audio_vae_fp32.safetensors"

curl.exe -L -C - -o "$te\qwen3vl_32b_minimax_h3_nvfp4_awq.safetensors" `
  "$hf/text_encoders/qwen3vl_32b_minimax_h3_nvfp4_awq.safetensors"
The -C - flag makes every download resumable, so a dropped connection just means re-running the same line.
Step 5. Restart, load and run
Fully quit ComfyUI Desktop, not just the window, and relaunch so the new packs are scanned. Download the workflow JSON from the Fox Fur Essence Films Patreon post, drag it onto the canvas, and point the loaders at your files: the ref2va diffusion model for reference work, both VAEs, and the text encoder. Toggle the branch you need with the workflow's switches.
One expectation to set: the first run is slow, because Triton compiles the Sol-Attn kernels on first use and caches them. Run two is the honest benchmark.
If anything imports with errors, the usual suspects in order: packages installed into the wrong Python (re-run with $Py), a stale Triton cache from an older torch surviving an upgrade (delete %USERPROFILE%\.triton and relaunch), or Sage Attention needing a reinstall after a torch change.
A note on the prompts
I am not publishing the full prompts, but the structure is worth describing because it is what makes the control possible. MiniMax H3 responds best to a structured brief rather than a paragraph of description: subject definitions tying each reference to a role, a summary declaring the generation mode, a retention analysis stating explicitly which references are fully preserved and which only transfer attributes, a detailed shot description, and the soundscape. The retention analysis is the part doing the real work, since it is where you tell the model that the video contributes motion and camera path only, and that none of its people, clothing or environment may survive into the output.
That structure comes at a cost in length, and length is where platforms differ. Running the same brief on Magnific meant condensing the prompt considerably to fit within its character limit, trimming every definition and description down to essentials while keeping the retention logic intact. The condensed version still delivered, which says the structure matters more than the word count, but it is a real constraint to plan for when a brief is complex: on a hosted platform, every character of subject definition competes with every character of shot description.
What's next
Three platforms, one prompt language, and results close enough that the choice comes down to time, cost and control rather than quality. Locally the new workflow makes the wait shorter and the setup more flexible; in the cloud the same job runs faster still, inside a hard execution ceiling worth respecting; and hosted platforms like Magnific make the model accessible without any of the installation above. The next tests are longer motion sources and mixed 3D and live-action references, and the Claude skill will keep absorbing what each run teaches it.
Credits. The Advanced Filmmaking workflow is by Fox Fur Essence Films. Custom nodes by kijai, xmarre and GACLove. Model weights from Comfy-Org on Hugging Face.
The new workflow
The stock ComfyUI workflow for H3 works, but it leaves performance on the table. The Fox Fur Essence Films workflow layers several speedups on top of the same model: Sol-Attn sparse attention, Spectrum transformer-step forecasting, EasyCache step caching, INT8 quantised models and a LoRA-based acceleration, with optional RIFE frame interpolation to take the 24fps output to 60. In my tests with image references at 1MP, the same job dropped from 1,250 seconds on the stock workflow to 680 seconds on this one, a reduction of roughly 45% on the same machine and settings.
With a video reference the gains are even larger than I first measured. My initial run of the basketball test clocked 2,619 seconds, and I have not been able to reproduce anything like that number since; rerunning the same job on the updated workflow came down to 573 seconds, and I would rather report both honestly than quietly keep the better one. First runs compile kernels, caches warm up, and a single measurement of anything is not a benchmark.
The most useful tweak I found is hiding in the video loader. When you load a reference video there is an option to select every Nth frame, which controls how densely the model reads the motion source. Reading every frame put the 6 second, 1MP job at 865 seconds; reading every third frame brought it to 455 seconds, nearly halving the time again. The trade shows up where you would expect, in some lost detail on fast movement, but the overall motion and the adherence to the reference stay very good, and for most shots every third frame is plenty.
The workflow also adds quality-of-life control that matters more than the speed: a reference control panel with toggles for up to 6 picture references, video references and audio references, so switching between a simple image-to-video job and a full multi-reference setup no longer means rewiring the graph.
It also adds quality-of-life control that matters more than the speed: a reference control panel with toggles for up to 6 picture references, video references and audio references, so switching between a simple image-to-video job and a full multi-reference setup no longer means rewiring the graph.
The test: building a scene from parts
The brief I set myself was a one-on-one basketball play, one continuous handheld shot, drive past the defender into a jump shot, camera whipping up as the ball drops through the net.
Everything was assembled from separate sources:
The characters. Both players were generated in Magnific, then converted into multi-angle character sheets, front, back, side and face close-ups, so the model has identity from every direction it might need.
The arena. Generated separately as an empty environment: polished hardwood, green neon tubing along the perimeter, dark empty bleachers, one warm pool of light at centre court.
The opening frame. A single still of the two players mid-contest on that court, giving the generation its starting state.
The motion. A stock clip of a real street basketball game, supplying only the play and the camera path.
This is the part that keeps me on this model. H3 reads all of these together as one context, holds the identities from the sheets, builds the scene from the arena frame, and takes only the movement and camera behaviour from the video. None of the source clip's people, clothing, daylight or portable hoop survive into the output. The prompt controls this explicitly through a retention analysis, declaring which references are fully preserved and which only transfer attributes; more on how that structure works, and its limits, further down.
The three-way comparison
Same brief, same references, run on three platforms:
Platform | Settings | Generation time | Notes |
|---|---|---|---|
ComfyUI Desktop (RTX 5090 laptop), new workflow | 6s, 1MP, 20 steps, video reference, every 3rd frame | 455s (~7.5 min) | 865s reading every frame; my first ever run clocked 2,619s and never repeated |
Comfy Cloud | 6s, 1MP, 20 steps | 931s (~15.5 min) | |
Comfy Cloud | 6s, 2MP, 30 steps | Failed | Hit the platform's job execution time limit |
Magnific | 6s, 768p, 16:9 | ~4 min | Cleanest output of the three; 1,560 credits for this job |
The Comfy Cloud failure is worth understanding rather than just noting. Cloud platforms cap how long a single job may run, and the 2MP, 30 step version exceeded that ceiling at around 36 minutes and was killed, with the compute time still spent. The lesson transfers to any hosted generation: know the execution limit before committing to a heavy configuration, and treat high-resolution, high-step runs as something you earn with a successful low-cost test first, exactly as on local hardware, where the constraint is VRAM and patience instead of a hard timeout.
All three successful generations came out very similar in motion quality, with Magnific producing the cleanest video. The desktop version then went through my Wan 2.2 T2V 14B upscale workflow to reach 1920 x 1080, which added another 752 seconds.
Where hosted platforms fit: the cost side
With local generation now under 8 minutes a clip, the question stops being local or hosted and becomes which jobs belong where. My working answer is that local carries the volume and hosted platforms carry the jobs that local cannot, whether that is hardware you do not have, a cleaner output for a hero shot, or the image models around the video work.
The numbers make the split concrete. The basketball job on Magnific, 6 seconds at 768p with one video reference and 4 image references, cost 1,560 credits. A year of Magnific Plus, priced at £24 a month on the annual plan at the time of writing, works out at £288 for 600,000 credits, which at this job's rate is roughly 385 videos of similar complexity, or about 75p per video. Video at pennies per directed take changes what you can promise a client, and the subscription earns its place well beyond video: it includes access to strong static image models such as Seedream 5 Pro, Nano Banana Pro and GPT Image 2, which is exactly where the character sheets and seed images in this test came from, plus a library of stock video usable as motion reference. Since a great seed image is most of what makes a great video, and video burns credits far faster than images, the economics favour a hybrid: build the image assets and occasional hero generations on the subscription, run the volume and the upscales locally, and you get MiniMax-level precision without needing premium per-generation platforms for every shot. For client work, that is a budget line you can actually predict.
Yes, even locally it takes minutes rather than seconds. But the fidelity to direction is the point: the play unfolds as written, the characters hold, the camera does what the prompt says. There are no wasted generations, and that changes the economics entirely, because one directed generation that lands beats an afternoon of fast rolls that do not.
Installing the workflow and models
What follows is the full setup for the Advanced Filmmaking workflow on a ComfyUI Desktop (standalone) install on Windows with an NVIDIA card. It is longer than the basic MCP setup from part 1, because this workflow leans on a compiled dependency stack that has to agree with itself. Everything is PowerShell, run in a normal window unless stated. Keep a Claude chat open while you work through it; every failure below was diagnosed by pasting the error in.
A note before you start. This guide is shared as is, for information only, and describes what worked on my own machine. Running the commands, scripts and prompts in this article is entirely at your own risk, and I accept no responsibility or liability for any loss, damage, data issues or system problems that may result from following it. Modifying system settings, execution policies and configuration files can affect how your machine behaves, so only proceed if you are comfortable working with tools like PowerShell, and back up anything you care about first. The third-party software mentioned here belongs to its respective owners, and their own licences and terms apply.
Step 0. Set your paths
Set these once per PowerShell session so the rest copy-pastes cleanly. Adjust to your install:
powershell
$Comfy  = 'C:\ComfyUI-Desktop'              # root of your ComfyUI install
$Models = 'C:\ComfyUI-Desktop\models'        # your shared models directory (Desktop Settings > Storage)
$Nodes  = Join-Path $Comfy 'ComfyUI\custom_nodes'
$Py     = Join-Path $Comfy 'ComfyUI\.venv\Scripts\python.exe'
One warning that saves an hour: a standalone install has two Python executables, and only ComfyUI\.venv\Scripts\python.exe is the one that matters. Installing packages into standalone-env\python.exe succeeds, reports success, and changes nothing. Every pip command below uses $Py for that reason. Sanity check:
powershell
& $Py -c "import torch; print(torch.__version__)"
Step 1. The dependency stack
The workflow author is explicit about CUDA 13.0, since the INT8 convolution path runs roughly twice as slow on 12.6. Five layers have to agree: the NVIDIA driver (r580 branch or newer), optionally the CUDA Toolkit 13.0, PyTorch built for cu130, Triton for kernel compilation, and Sage Attention. Check everything at once:
powershell
nvidia-smi --query-gpu=driver_version,name,memory.total --format=csv,noheader
& $Py -m pip list | Select-String -Pattern '^(torch|triton|sage)'
& $Py -c "import torch, triton; print('torch', torch.__version__, '| cuda', torch.version.cuda, '| triton', triton.__version__)"
& $Py -c "import sageattention; print('sageattention OK')"
If torch does not end in +cu130, upgrade the trio together, since mismatched torch, torchvision and torchaudio break silently:
powershell
& $Py -m pip install --upgrade --index-url https://download.pytorch.org/whl/cu130 torch torchvision torchaudio
Triton on Windows is the triton-windows package, not triton, and it needs the free Build Tools for Visual Studio 2022 with the Desktop development with C++ workload installed, because it shells out to the Microsoft compiler at runtime:
powershell
& $Py -m pip install -U triton-windows
For Sage Attention, skip the 20 to 40 minute source build and use the prebuilt wheels from woct0rdho's releases, picking the one matching your CUDA, torch and Python versions:
powershell
& $Py -m pip install "https://github.com/woct0rdho/SageAttention/releases/download/v2.2.0-windows.post4/sageattention-2.2.0+cu130torch2.9.0andhigher.post4-cp39-abi3-win_amd64.whl"
If you upgrade torch later, Sage Attention must be reinstalled, since it links against the torch ABI.
Finally, update ComfyUI core through Settings, Updates. The Spectrum node targets a core from 3 August 2026 onwards, and EasyCache lives in core rather than as a custom node. Confirm with:
powershell
Get-ChildItem "$Comfy\ComfyUI\comfy_extras" -Filter '*easycache*'
That must print nodes_easycache.py. Nothing printed means the core is too old.
Step 2. Install the custom nodes
Three packs, plus EasyCache which needs nothing:
powershell
Set-Location $Nodes
git clone https://github.com/kijai/ComfyUI-SolAttn_triton.git
git clone https://github.com/xmarre/ComfyUI-Spectrum-MiniMax-H3.git
git clone https://github.com/GACLove/ComfyUI-VFI.git
The trap here: ComfyUI-VFI by GACLove is not the same pack as ComfyUI-Frame-Interpolation by Fannovel16, even though both do RIFE and look interchangeable in Manager. This workflow calls GACLove's node specifically, and already having the other one installed does not satisfy it.
Cloning does not install requirements, which is the step people skip and the source of most IMPORT FAILED errors. This handles any pack that ships one:
powershell
Get-ChildItem $Nodes -Directory |
  Where-Object { Test-Path (Join-Path $_.FullName 'requirements.txt') } |
  ForEach-Object { & $Py -m pip install -r (Join-Path $_.FullName 'requirements.txt') }
Step 3. Pre-download the RIFE weights
The VFI pack auto-downloads its weights on first use, but its downloader can die mid-render on standalone Python builds with an OpenSSL error, after you have already waited through the whole video pass. Fetch it up front instead:
powershell
$vfi = Join-Path $Nodes 'ComfyUI-VFI'
$tmp = Join-Path $vfi '_temp'
New-Item -ItemType Directory -Force -Path $tmp | Out-Null
$zip = Join-Path $tmp 'RIFEv4.26_0921.zip'
curl.exe -L --retry 5 -o $zip 'https://huggingface.co/hzwer/RIFE/resolve/main/RIFEv4.26_0921.zip'
Expand-Archive -LiteralPath $zip -DestinationPath $tmp -Force
$fl = Get-ChildItem $tmp -Recurse -File -Filter 'flownet.pkl' | Select-Object -First 1
Copy-Item $fl.FullName (Join-Path $vfi 'rife\train_log\flownet.pkl') -Force
Remove-Item $tmp -Recurse -Force
Step 4. Download the models
All weights come from Comfy-Org/MiniMax-H3 on Hugging Face. The workflow uses two model families, one per branch: fl2va for text-to-video, image-to-video and first-and-last-frame work, and ref2va for reference-to-video, which is the branch everything in this article runs on. The recommended variants are the pruned_int8_convrot quantisations at about 19.5GB each, which are what the INT8 speedup targets. A full setup with both branches, VAEs and the text encoder is around 60GB, so check disk space first.
powershell
$hf  = 'https://huggingface.co/Comfy-Org/MiniMax-H3/resolve/main'
$dm  = Join-Path $Models 'diffusion_models'
$vae = Join-Path $Models 'vae'
$te  = Join-Path $Models 'text_encoders'

curl.exe -L -C - --retry 8 --retry-delay 5 --retry-all-errors `
  -o "$dm\minimax_h3_fl2va_pruned_int8_convrot.safetensors" `
  "$hf/diffusion_models/minimax_h3_fl2va_pruned_int8_convrot.safetensors"

curl.exe -L -C - --retry 8 --retry-delay 5 --retry-all-errors `
  -o "$dm\minimax_h3_ref2va_pruned_int8_convrot.safetensors" `
  "$hf/diffusion_models/minimax_h3_ref2va_pruned_int8_convrot.safetensors"

curl.exe -L -C - -o "$vae\minimax_h3_video_vae_fp16.safetensors" `
  "$hf/vae/minimax_h3_video_vae_fp16.safetensors"

curl.exe -L -C - -o "$vae\minimax_h3_audio_vae_fp32.safetensors" `
  "$hf/vae/minimax_h3_audio_vae_fp32.safetensors"

curl.exe -L -C - -o "$te\qwen3vl_32b_minimax_h3_nvfp4_awq.safetensors" `
  "$hf/text_encoders/qwen3vl_32b_minimax_h3_nvfp4_awq.safetensors"
The -C - flag makes every download resumable, so a dropped connection just means re-running the same line.
Step 5. Restart, load and run
Fully quit ComfyUI Desktop, not just the window, and relaunch so the new packs are scanned. Download the workflow JSON from the Fox Fur Essence Films Patreon post, drag it onto the canvas, and point the loaders at your files: the ref2va diffusion model for reference work, both VAEs, and the text encoder. Toggle the branch you need with the workflow's switches.
One expectation to set: the first run is slow, because Triton compiles the Sol-Attn kernels on first use and caches them. Run two is the honest benchmark.
If anything imports with errors, the usual suspects in order: packages installed into the wrong Python (re-run with $Py), a stale Triton cache from an older torch surviving an upgrade (delete %USERPROFILE%\.triton and relaunch), or Sage Attention needing a reinstall after a torch change.
A note on the prompts
I am not publishing the full prompts, but the structure is worth describing because it is what makes the control possible. MiniMax H3 responds best to a structured brief rather than a paragraph of description: subject definitions tying each reference to a role, a summary declaring the generation mode, a retention analysis stating explicitly which references are fully preserved and which only transfer attributes, a detailed shot description, and the soundscape. The retention analysis is the part doing the real work, since it is where you tell the model that the video contributes motion and camera path only, and that none of its people, clothing or environment may survive into the output.
That structure comes at a cost in length, and length is where platforms differ. Running the same brief on Magnific meant condensing the prompt considerably to fit within its character limit, trimming every definition and description down to essentials while keeping the retention logic intact. The condensed version still delivered, which says the structure matters more than the word count, but it is a real constraint to plan for when a brief is complex: on a hosted platform, every character of subject definition competes with every character of shot description.
What's next
Three platforms, one prompt language, and results close enough that the choice comes down to time, cost and control rather than quality. Locally the new workflow makes the wait shorter and the setup more flexible; in the cloud the same job runs faster still, inside a hard execution ceiling worth respecting; and hosted platforms like Magnific make the model accessible without any of the installation above. The next tests are longer motion sources and mixed 3D and live-action references, and the Claude skill will keep absorbing what each run teaches it.
Credits. The Advanced Filmmaking workflow is by Fox Fur Essence Films. Custom nodes by kijai, xmarre and GACLove. Model weights from Comfy-Org on Hugging Face.

